The steps of getting Invisalign® –
This page outlines the Invisalign® process from the first stages of planning until your case’s treatment is actually begun.
Our coverage is mostly focused on those steps that you, the patient, are directly involved with. They include: 1) The initial consultation, 2) Taking records (impressions/scans), 3) Approval of the ClinCheck® treatment animation, and 4) Receiving your first aligners and starting your treatment.
The process of getting Invisalign® –
Step #1 – The initial consultation.
Once you’ve decided that you’re interested in the idea of having Invisalign® treatment, there will probably be lots of things that you will want to know before you make the final decision to go ahead with it.
The way you get this information is by scheduling a consultation appointment with an Invisalign® provider. This might either be an orthodontist or a general dentist (possibly even your own).
During the consultation, you’ll get to ask the dentist questions, and they’ll get to evaluate you.
Actually, this initial appointment serves two purposes:
- First of all, it’s your chance to get some answers about invisible braces that nobody else, except a dentist treating your case, can answer. Things like: How much will your treatment cost? Orthodontic fees. and How long will your case take? What’s usual?
- The exam is also an opportunity for the dentist to confirm that this technique (either standard Invisalign® or possibly even Express or Teen Invisalign® alternatives.) makes a good choice for treating your case.
All of this is important because systems like Invisalign® are just one out of many ways Orthodontic systems. to straighten teeth. They aren’t right Invisalign® disadvantages. for treating every type of case. And sometimes other methods offer specific advantages. That’s what this initial consultation is all about, learning.
Ask if the consultation is complimentary (free).
When you call to schedule your appointment, ask if there are any fees involved. You’ll probably find that this initial consultation is complimentary.
The appointment itself will likely be fairly short. You’ll probably be talking with the dentist for about 15 minutes or so.
Step #2 – Taking the “records” for your case.
Before your dentist can plan your Invisalign® treatment, they’ll first need to collect information that documents how your teeth and bite are right now. This is called “taking records.”
The types of data they’ll need are photographs, x-rays, dental impressions, and bite registration. Here are more details.
A) Dental impressions.
A dental impression is simply a copy of your teeth. It can either be a physical copy (taken using impression putty, see picture A) or it can be a digital one (taken using an optical scanner).

The records needed to start an Invisalign® case.
Option #1 – Traditional dental impressions.
Option #2 – Digital dental impressions.
Most patients seem to prefer the convenience of having an optical scan vs. having conventional impressions taken. Beyond that, another advantage is that optical impressions offer greater accuracy (which aids with aligner fit).
Also, a digital impression can be transferred electronically, which helps to speed up the amount of time it takes for Invisalign® treatment planning (ClinCheck® simulation) and manufacturing your case’s set of aligners.
B) Bite registration
Even if your dentist has a perfect copy of your upper and lower teeth, it may not be obvious to them how the two come together when you close. That’s why taking a bite registration is important.
If conventional dental impressions have been taken, your dentist will spread a layer of fast-setting paste on your teeth and then have you close down. Once the paste has set, they’ll have a record of your “bite” (Picture B).
In the case that your impressions have been taken optically, the same scanner will be used to capture the way your teeth come together.
Dental x-rays.
X-rays allow your dentist to evaluate tooth root and jawbone health as well as current root positioning. Either a full-mouth series or panoramic x-ray (Picture C), or possibly both, will be needed.
Photographs.
Invisalign® requires a series of 8 patient pictures for every case. This includes front and side full-face photos, front and side close-ups of your teeth closed together, and close-up pictures of each dental arch (upper/lower).
How long does taking your records take?
Taking records for an Invisalign® case usually requires about an hour, or maybe an hour and a half, of appointment time. Your dentist may do some of the work, but more likely most of it will be delegated to one of their assistants.
Payment may be due.
Some dentists require a down payment at the completion of this appointment. Rather than be caught off-guard, you should check to see what your dentist’s policy is.
Step #3 – The Invisalign® prescription form.
Once your dentist has collected all of your required information, they’ll fill out an Invisalign® prescription form for your case.
This is a formal document that specifies details about your current dental status, the alignment changes sought, and information about the way your dentist wants your case approached.
Your records are sent to Align Technology.
All of the items created during your records appointment will be forwarded to Align Technology, Inc., the people who make Invisalign®. They have the ability to receive the forms, photos, and x-rays electronically via the web. The impressions, unless they’re digital ones, will have to be shipped.
Step #4 – Invisalign® will organize your case as digital information.
With traditional impressions.
In the case that the impressions of your mouth that your dentist has submitted are traditional (physical) ones, technicians at Align Technology will transform them into a digital file by scanning them with a CT (computed tomography) scanner.
With optical impressions.
If your dentist took your impressions via an optical scan, Align Technology will already have the information they need in digital form.
Either way, your mouth’s digitized data is then used to create an on-screen 3-D model of your upper and lower teeth.

Ask to see your case animation played through.
A technician will create your ClinCheck® treatment simulation.
Step #5 – Your dentist will evaluate and OK your treatment animation.
At this point, your treatment simulation will be made available to your dentist (online) via Align Technology’s ClinCheck® software.
This software gives your dentist the ability to evaluate your animation from any angle. After viewing it, your dentist can request changes to the proposed treatment plan if they feel they are needed.
Ask if you can see your animation.
Your dentist may want to show your simulation to you, so they can get your input.
This is your chance to see the future.
Even though it’s just an animation, getting a chance to see what the realignment of your teeth will look like at the completion of your treatment is a unique feature of Invisalign® and not something that’s typically available with traditional orthodontic techniques.
As an additional benefit, since a proposed treatment plan has been created, your dentist can explain issues to you such as how many sets of aligners What’s usual? you will wear and if buttons or attachments What are these? will be needed.
Once everyone’s satisfied, your dentist will give their approval and a go-ahead to Align Technology, Inc.

A series of Invisalign® aligners. (4 upper/lower sets.)
Step #6 – Invisalign® will make your sets of aligners.
- Depending on the complexity of your case, this may involve as few as 10 or as many as 30 or more pairs of casts. A paper by Malik states that the typical course of treatment usually requires around 25.
- Each cast represents a specific stage that your teeth will take at a specific point during your treatment.
- Individual aligners are then fabricated on each cast.
Once the fabrication process has been completed, your complete series of aligners, all of those needed for your entire course of treatment, will be delivered to your dentist as a single shipment.
After records are taken, how long does it take to get your aligners?
There are a couple of variables that will affect how quickly the records your dentist submits are then transformed into your set of aligners.
- One is simply how long it takes your dentist to review and OK your ClinCheck® treatment simulation. If you are included in this evaluation, difficulties in scheduling may slow the process down.
- If any changes are made to your proposed treatment plan, additional days will be required so an Align Technology technician can revise your case’s ClinCheck® animation to include them. Your dentist will then need to view and OK these changes.
So, how long does it take to have your aligners made, start to finish?
In some instances, it may be possible for your dentist to receive your aligners in as little as 3 weeks or so. More realistically, it will probably take 4 to 6.
7) Everything is now set for you to begin your Invisalign® treatment.
Once your dentist has received your set of aligners, they’ll schedule you for an appointment so you can get started with your treatment. The remainder of this page describes the usual treatment process.
Invisalign® treatment details.
Here are details about what to expect once your treatment has begun.
- How much do you need to wear your aligners?
- How many weeks is each aligner worn? How often are checkups?
- How many sets of aligners will you wear?
- How long will your treatment take? (Including vs. conventional braces.)
- How long do you have to wear retainers after having Invisalign®?
A) How much / how often do you wear Invisalign® tooth aligners?
1) You’ll need to keep your aligners in all of the time.
You’ll be expected to wear your Invisalign® aligners pretty much around the clock. The only exceptions are when you’re eating foods, drinking beverages, smoking, or cleaning your teeth and aligners.
How many hours each day, minimum?
For most people, around-the-clock wear should translate to somewhere between 20 to 22 hours per day, with your dentist no doubt leaning toward the latter number.
And as insufferable as that may seem, just remember that with other types of braces you’re shackled to them 24 hours a day, so consider the 2 hours or so of respite you’re allowed each day to be the giant advantage that it is.
More details about wearing Invisalign® …
- Drinking beverages. Yes, no, which ones?
- Eating foods. / Chewing gum. Is anything permitted?
- Cleaning your aligners. How to.
2) You can remove your aligners for special occasions.
You can take your aligners out for special events. This might include activities where you’ll be speaking in a public setting. Or times when you’ll have close social interactions with people and it would be embarrassing for you to have your aligners detected.
More information about wearing Invisalign® …
- Speaking. Problems | Remedies
- What do the aligners look like? Pictures | Details
- How “invisible” are they? The tipoffs.
c) Not wearing your aligners enough is a big deal.
Even though you can take your appliances out whenever you want, if you do so without a good reason you’re not doing yourself any favors.
- Your treatment can’t progress unless your aligners are worn. So if you don’t wear them as directed, your treatment may take longer than planned.
- Whatever treatment advances you’ve made will tend to relapse when your aligners are out. So, rather than just not move forward with your treatment, you may actually lose ground.
- As a worst-case scenario, the amount of relapse that occurs may be great enough that your case veers totally off track and a “mid-course correction” Meaning a new set of aligners. is needed, along with the added expense and delay in treatment that that entails.
d) Things you can do to help things along.
You might envision that just wearing your aligners is all you need to do. And to a great extent that is correct.
But by paying a little bit of attention to how things are progressing in terms of aligner fit, you can help to ensure that your case is kept on track by confirming that each set of appliances has accomplished its intended task.
What to look for.
The end goal of wearing each set of aligners is that your teeth have shifted to the point where they fit fully and comfortably into them (there are no significant pressure points). This is proof that the alignment of both matches. Toward reaching this goal:
- As you wear your aligners, clench into them periodically to confirm that they are seated fully and therefore are exerting their full pressure onto your teeth as designed.
- Discovering that air spaces exist between your aligner and the biting edges of your teeth is a sign that the appliance doesn’t seat fully. So if these types of air gaps exist, clench into your aligners more frequently.
Be in touch with your dentist. If the gaps still persist at the end of your normal two-week wear period, they’ll probably want you to continue to wear your current set for longer.
B) How long do you wear each set of aligners?
In most cases, Invisalign® aligners are worn on the order of two weeks. But there can be situations where they need to be worn longer.
The general idea is that you’ll wear each set until that point where your teeth fit fully into them comfortably and relatively loosely.
- If this transition takes place in the expected two-week time frame, great.
- If not, then you’ll need to wear that set longer.
You’ll probably want confirmation from your dentist that planning to do so is the correct thing to do, and you should. But generally speaking, a decision to do so is a safe one and helps to ensure that your case stays on track (in regard to the expected tooth movement has taken place with each set of aligners, not time).
C) How often are checkups?
Since they’ll need to monitor your progress to make sure that everything is going as planned, your dentist will schedule you for checkup appointments every four to six weeks.
At each checkup, your dentist will send extra sets of aligners home with you.
Based on the standard intervals given above, at each appointment your dentist will need to give you at least one or two additional sets of aligners to take home. They’ll also need to give you specific instructions about when to start wearing them.
What takes place during checkup appointments?
In most cases, you can expect that each checkup appointment will be fairly short. It may just involve your dentist looking at your teeth and making notes. However, at times it may also need to include some type of minor dental procedure.
- If your case involves the use of Invisalign® “buttons” or “attachments,” What are these? they may need to be added or removed. (These devices assist the aligners in making tooth movements.)
- Your dentist may need to “strip” your teeth. (Create space between them by narrowing each one just slightly.)
(Use this link for more information and an animation showing how this technique is used: Orthodontic techniques: Tooth stripping. The process explained.)

A series of Invisalign® tooth aligners (4 upper/lower sets).
D) How many sets of aligners will you end up wearing?
How many are usually worn?
- On average, the typical Invisalign® case might require between twenty and thirty sets of aligners.
- At the extremes, the actual number might be as few as ten or up toward fifty.
“Sets” may not really be the correct term.
On our pages, we usually refer to Invisalign® aligners as being used in “sets.” One aligner is worn on the upper teeth and another on the bottom, and then these aligners are replaced by new aligners at the same time.
- With some cases, there may be a different number of aligners for each jaw, with each being worn for a different number of weeks.
- In other cases, “passive” aligners may be used. The fit of these appliances is one where they don’t move teeth, they just hold them in place during that time frame while the aligner on the opposing arch is accomplishing its task.
Invisalign® aligners should never be thrown away without your dentist’s permission.
Even though your aligners are usually just worn for a few weeks, you shouldn’t throw any of them away without getting an OK from your dentist first.
If a situation develops where your treatment begins to veer off track, your dentist may have you stop wearing your current set of aligners and go back and re-wear some of your previous ones.
E) How long will your Invisalign® treatment take?
Compared to regular braces.
For the most part, an Invisalign® case will generally take about the same amount of time as when conventional braces (brackets and wires) are used. Some published reports suggest that the time needed may be less. You’ll simply have to ask your orthodontist what their experience has been with cases like yours.
Most Invisalign® cases take about a year.
Align Technology, Inc. (the people who make Invisalign®) suggests that, on average, cases are completed in about 12 months.
Since the treatment time frame for conventional braces is usually between twelve to twenty-four months, that estimate may be evidence that removable aligners are best suited for relatively less involved orthodontic cases. Invisalign® limitations. Ones that can be completed in relatively shorter time frames.
Want to know how long your treatment will take? – Just do the math.
It’s easy enough to calculate how many months your case should take.
- All of the aligners needed for your treatment How many? are fabricated before it’s begun.
- Since each set of aligners is typically worn for two weeks, simply multiply the total number of sets by two and then divide by four.
Of course, based on your case’s computer simulation ClinCheck® animation. your dentist knows precisely how many sets, and how much time, will be needed even before your aligners are made. And this really is an advantage over conventional braces where the treatment estimate that’s given is much less precise.
Another method: Take a look at your most crooked (“lead”) tooth.
With any patient’s case, there is a “lead” tooth. This is the one that needs to be moved the most (either in terms of linear distance or amount of rotation needed, or both).
A single Invisalign® aligner is typically used to create at most about .25mm of movement (roughly 1/100th of an inch) or about 2 degrees of rotation. So, the lead tooth dictates how many individual aligners will be needed.
Of course, you probably don’t have the capability to make this measurement. But, FYI, it is what everything is based on.
F) You’ll need to wear retainers after your Invisalign® treatment is finished.

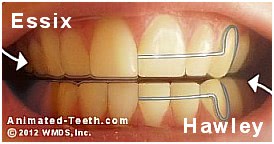
Essix and Hawley appliances are the most frequently used removable retainers.
The chance of alignment relapse after Invisalign® (or any other type of orthodontic treatment) is substantial and even likely unless retainers are worn as directed by your dentist.
More information about …
- Types of orthodontic retainers. Options | Pros & Cons
- Details about wearing retainers. How much? How long?
Page references sources:
Malik OH, et al. Invisible orthodontics Part 1: Invisalign.
All reference sources for topic Teeth Straightening.