The tooth extraction procedure and what it’s like for the patient. –
Here’s how dentists pull teeth.
And what the experience will be like for you.
This page outlines the process that a dentist uses when they extract a tooth. And along the way, we explain what each step is like for you the patient.
- We explain the purpose of each of the steps of the extraction process and how the dentist carries them out. (What instruments they use, how they use them, how long each step takes).
- We also describe what each step is like for you. Like the the routine sounds and sensations (pressure and pain) you may/likely will experience. And we tell you why they occur.
Table of contents –- Why knowing what to expect is key to having a pleasant experience.
- Extracting teeth – The procedure & what each step is like for you.
- Numbing you up and testing for numbness.
- The tooth extraction process.
- The principles used to “pull” teeth.
- Extraction instruments – Elevators, extraction forceps. | How they’re used.
- Sensations you may experience.
- Pain vs. pressure – Why feeling pressure is expected.
- Noises you may hear.
- Closing your extraction site.
- Wrapping up your appointment – Post-op instructions. | Your trip home.
- Differences between Simple vs. Surgical Extractions.
The more you know about the extraction process, the easier your procedure will be.
The process of pulling your tooth is more likely to go quickly and uneventfully if you, the patient, take a few moments and learn what to expect during your upcoming procedure. That’s because there’s nothing more important for a dentist during an extraction procedure than having a cooperative patient.
Learn what’s normal so you can signal if things aren’t.
When we say “a cooperative patient” we don’t mean a person who passively martyrs themself to extraction agony (as if very many people successfully could). Instead, we mean a patient who has an idea of what to expect during their procedure so they can accurately indicate to their dentist when something has gone amiss, and otherwise, just let their dentist go about doing their work.
A dentist needs a patient who understands when pressure is likely to be felt and why that shouldn’t be a concern. Or why hearing certain sounds should be considered routine. Yet also, one who knows if they do feel pain how to succinctly communicate that to their dentist so it can be rectified. We explain all of this on this page.
Patient cooperation makes all the difference.
Patients who moan, flinch, and squirm at every non-issue sound or sensation are simply making their procedure more difficult and drawn out. They’re taking their dentist’s attention away from the process at hand and instead making them focus on patient management.
So, be intelligent. Take time to read through this page and learn what’s to be expected during a tooth extraction and what isn’t. That way if something out of the ordinary does occur you can promptly bring it to your dentist’s attention. Otherwise, they’ll simply have the luxury of just focusing on removing your tooth.
Taking this approach will help to ensure that having your tooth pulled will go as easily, quickly, and smoothly as possible. Something both you and your dentist want.
Extracting teeth – The steps of the procedure and what they’re like for you.
A) Numbing your tooth.
As a first step, your dentist will need to anesthetize (“numb up”) both your tooth and the bone and gum tissue that surround it.
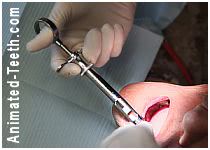
That means you’re going to get a shot, and probably more than one.
At this point in time, there is still no way for a dentist to reliably/predictably administer a local anesthetic except as an injection (a “shot”). And while we’ll admit that receiving one can hurt a bit, we’ll also emphatically state that it doesn’t always. It just depends on where the shot needs to be given (and sometimes your dentist’s technique).
You’ve probably been through this before.
The shots you get before pulling your tooth won’t necessarily be any different than those routinely given when placing a filling. But your dentist will need to numb up both your tooth and the tissues that surround it, so you’ll probably end up getting multiple injections (possibly just two).
If this is an unsettling subject for you, here’s more information about dental shots and why some pinch and others don’t. Reading this information may help to put your mind at ease: Will my dental injection hurt? Why some do.
Testing for numbness before your extraction.
Before the process of pulling your tooth is begun, you may have some apprehension about how “numbed up” you are and if it’s enough for your procedure. You’re not the only one who’d like to know for sure, and to check, your dentist will do some simple testing.
For starters, your dentist will use their fingers and push your tooth firmly from side to side. What they’re doing is testing to make sure that tooth manipulation doesn’t trigger any discomfort.
What will you feel as they do this test? If you’re numb, you won’t feel any pain but you should feel the pressure they apply. (We explain why below.)
As a second step, they’ll take a semi-sharp dental instrument (often an elevator, described below) and press it on the gum tissue around your tooth. Just like above, you should feel the pressure applied by the tool (that’s normal) but it shouldn’t cause any pain.
(By the way, your dentist isn’t just testing things with this process but is also starting to peel away (loosen and detach) the gum tissue from around your tooth. Your tooth extraction has begun.)
FYI: Here are more details about how a dentist tests for numbness before pulling a tooth What to expect.
If you do feel anything, make sure your dentist knows.
Obviously, if any of the above tests trigger a pain response, you absolutely need to let your dentist know because most likely they do need to give you more anesthetic.
FYI – The best dentists will set up a specific It-hurts signal with their patients before they test so there’s no mistaking that something is amiss and they need to stop. If yours didn’t, suggest it.
B) Pulling your tooth – What to expect.
The remainder of this page outlines the specific steps of the actual tooth removal process. We describe it in terms of:
- General challenges that removing your tooth may pose for your dentist.
- The kinds of extraction instruments that are usually used (along with the way in which they are used to work the tooth loose).
- What the steps of the process are like for the patient, in terms of what you are likely to experience (especially feel and hear).
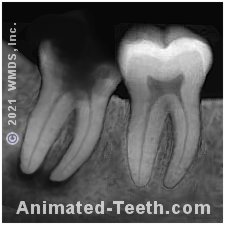
X-ray of a severely decayed molar slated for extraction.
Reference sources for our outline of the tooth extraction process ▼ – Fragiskos, Koerner, Wray
1) Pulling your tooth – Your dentist’s overall game plan.
When a tooth is extracted, here’s the situation that a dentist faces.
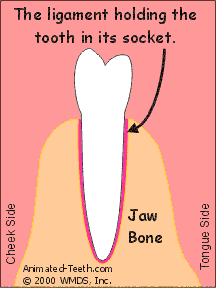
Ligament fibers attach to both the tooth and the bone.
- The root portion of the tooth is firmly encased in bone (its socket), and tightly held in place by its ligament (the fibrous tissue between the tooth and bone that binds the two together, see diagram above).
- To remove the tooth, the dentist must both: 1) “Expand its socket” (widen and enlarge it, see next section) and 2) Separate it from the ligament that binds it in place.
- After working towards this goal, possibly using an assortment of instruments (described below), a point is finally reached where the tooth has been loosened up enough that it’s free to come out.
What does “expanding” the tooth’s socket mean?
If you’ve ever tried to remove a tent stake that’s been driven deeply into the ground, you know that you can’t just pull the stake straight up and out.
Instead, you first have to rock it back and forth, repeatedly, so to widen (expand) the hole in which it’s lodged. (See animation below.) Then, once the hole has been enlarged enough, the stake can be easily removed.
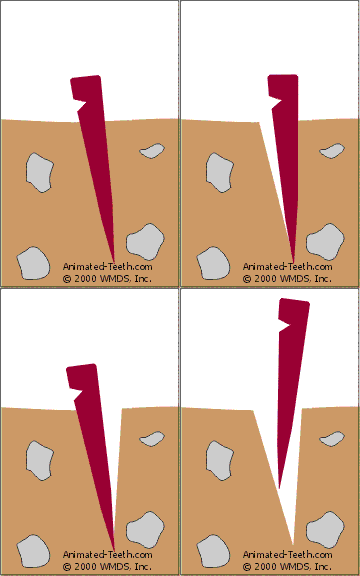
Rocking a tent stake back and forth “expands” its hole.
Extractions are somewhat the same.
In the case of teeth, it turns out that the type of bone tissue that encases their root(s) is relatively spongy. And due to this characteristic, when a dentist firmly rocks it back and forth against the walls of its socket, this bone compresses.
After repeated cycles of side-to-side pressure, the entire socket gradually increases in size (expands). (See animation below.) Finally, a point is reached where enough space has been created (and simultaneously the root’s ligament torn away enough) that the tooth can be removed easily.
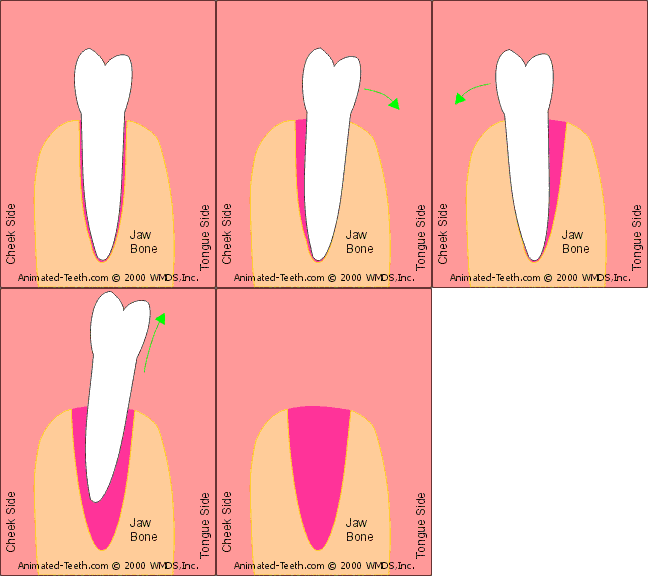
Rocking a tooth back and forth expands its socket.
2) Your dentist will use these tools when removing your tooth.
Dentists have a variety of instruments (tools) they use to grasp and apply pressure to teeth. Some of them are pliers-like instruments called “extraction forceps.” Others are specialized levers called “elevators.”
a) Periosteal elevator or desmotome.
As used with routine (simple, non-surgical) extractions, the use of either a desmotome or pointed periosteal elevator is generally interchangeable. These instruments are used to:
- Loosen up and detach the gum tissue that surrounds the tooth that’s being removed.
- To whatever extent possible, sever the tooth’s periodontal ligament. (The ligament that runs from tooth to bone and binds a tooth in its socket.)
How this instrument is used.
The pointed end of a periosteal elevator is worked downward along each side of the tooth into the crevasse between it and its surrounding gum tissue. As the dentist pushes down they will also push the gums away from the tooth, thus detaching them. Once that’s accomplished, there’s just that much less holding your tooth in place.
FYI – A periosteal elevator is the instrument we mentioned above when discussing how a dentist checks for adequate numbness. They’ll start off gently, asking you if you feel any discomfort.
- If you do feel pain, they’ll give you more anesthetic.
- If all you feel is pressure, that’s a good sign. That’s what’s expected if the area has been numbed up successfully. (So far so good).
(Note: A patient being able to discriminate between pressure and pain is an important aspect of their role in the extraction process. We discuss this issue below.)
Once your dentist knows that you are comfortable, they’ll get more aggressive with the use of the instrument and complete their job of separating your gums from your tooth.
b) Dental Elevators
A dental elevator looks a lot like a narrow screwdriver. That’s because, just like a screwdriver, an elevator has a handle and a specially designed “blade” or tip portion.
How dental elevators are used.
An elevator isn’t usually the only extraction instrument that’s needed to work a tooth on out of its socket (although in some cases it may be). Instead, here’s how this tool is usually used.
One technique involves wedging the instrument into the ligament space between the tooth and its surrounding bone (as shown in our animation).
As the elevator is forced into and twisted around in this space, the tooth is in turn rocked around and pressed against the walls of its socket. This helps to both expand the socket and separate the tooth from the ligament that binds it in place.
As this motion is continued, the tooth will gradually become more and more mobile. Further insertion of the elevator into this space may drive the tooth on out of its socket (especially with single-rooted teeth).
Using an elevator to extract a tooth.
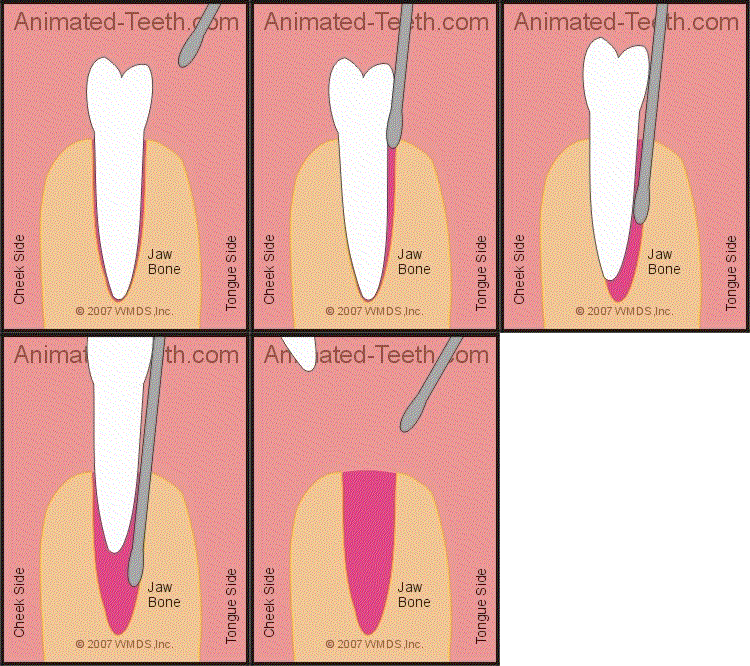
The wedging action of an elevator tends to loosen up and lift the tooth out.
The way an elevator is used is to wedge it in between the tooth and the crest of the surrounding bone. The bone serves as the fulcrum point as the elevator is used to apply upward pressure on the tooth, thus lifting it out of its socket.
In some cases, the dentist may be able to completely remove the tooth just by using an elevator. If not, they will choose a point where they feel they have accomplished as much as they can and will then switch to using extraction forceps (see below) to complete the extraction.
FYI – A dentist will almost always start the extraction process using an elevator. They’ll try to loosen up the tooth as much as possible before having to switch to using forceps (dental pliers).
A part of the reasoning behind this sequencing is that the possibility exists that the tooth may break once the pressure of the forceps is applied. If so, it may be more difficult to grasp and finally work free.
By using an elevator first, if the tooth does break, the dentist at least has the advantage that the portion that remains has already been loosened up some. And that can prove to be a significant asset.
As a side note, it’s a pretty talented dentist who routinely removes teeth just using an elevator alone.
What will you feel when a dental elevator is used?
You’ll feel the pressure of the tool being worked around your tooth. And it may feel like your dentist is doing a fair amount of gouging with it. But feeling pressure is expected and normal during an extraction (see below). However, if you do feel sharp pain, just use your “it hurts” signal so your dentist knows to stop and evaluate.
We’ll mention that a tooth, especially one that has advanced tooth decay tooth or a history of having root canal treatment, may receive enough pressure from the elevator that it breaks, and you may hear that. If so, there’s no need to be overly concerned. Things like this happen during extractions. (Just another workday for your dentist.) They’ll get the piece out. Probably using an elevator.
c) Extraction Forceps
Forceps are dental instruments that look like specialized pliers. They are used to grasp and manipulate teeth during the extraction process.
A dentist will usually have several different ones on hand, each having a design that’s tailored to:
- The general shape of the tooth it’s intended to remove, like large or small, or rounded or flat profile.
The tooth’s root configuration will also play a role (the dentist wants to be able to firmly grasp and apply pressure low down on the tooth). For example, the design will vary depending on whether it is 1, 2, or 3 rooted.
- The location of the tooth in the mouth (such as front vs. back, or left vs. right side of the jaw).
How extraction forceps are used.
A dentist will grasp a tooth with their forceps and then slowly yet firmly rock it back and forth (side-to-side) as much as it will. They may use quite a bit of force as they do this but it will be controlled and deliberate.
Extracting a tooth with forceps.
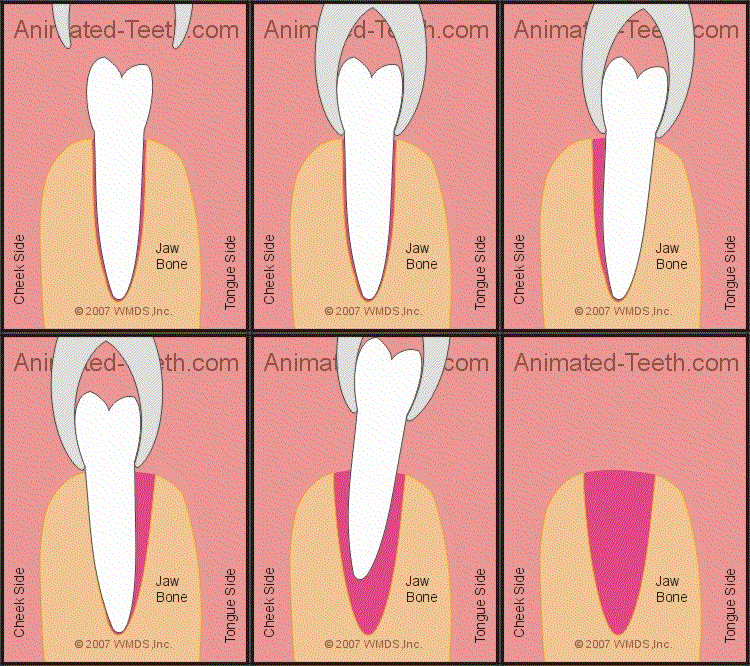
Rocking the tooth back and forth with the forceps expands its socket.
Because the bone that surrounds the roots of a tooth is compressible, this action will gradually expand the size of the tooth’s socket. As it does, the range of the dentist’s side-to-side motions will increase.
In addition to this rocking motion, the dentist will also rotate the tooth back and forth. This twisting action helps to rip and tear the tooth away from the ligament that binds it in place.
At some point, the socket will be enlarged enough, and the ligament is torn away enough, that the tooth can be removed. As compared to the use of elevators, most teeth are ultimately taken out via the use of forceps.
FYI – You might be surprised to learn that dentists don’t really “pull” teeth. Instead, when a dentist uses their forceps, at least initially, they don’t so much pull out on the tooth as push in.
They know that just pulling out won’t work because at this point the tooth’s ligament is still mostly attached, and its socket hasn’t been expanded enough yet.
What they want is for the force they create to be directed more so toward the root of the tooth, which will tend to act as a pivot location for the expansion of the socket’s walls (see picture above).
Then yes, after the tooth is good and loose, the dentist will “pull” the tooth on out.
▲ Section references – Wray
What will you feel while extraction forceps are being used?
Expect to feel the pressure that your dentist creates as they use the forceps to rock your tooth back and forth, side to side. You’ll probably feel less pressure when they use the forceps to rotate your tooth back and forth. Feeling pain shouldn’t be a factor. If it is, use your “it hurts” signal so your dentist can stop and remedy things.
Tooth breakage during the extraction process is always a possibility and you may hear that happen. If it does, retrieving broken pieces is usually routine and just part of your dentist’s job.
C) What does it feel like to get a tooth extracted?
[ We’ve updated our information and now have an entire page dedicated to the subject of what you might feel (pain, pressure) during your extraction process. What to expect.]
The single most important thing you need to know …
The local anesthetics that dentists use to “numb up” teeth are very effective in inhibiting (konking out) the types of nerve fibers that transmit pain. But they aren’t as effective on nerve fibers that relay pressure sensations. So …
1) You will feel pressure.
This different effect on different types of nerve fibers means you should expect to feel pressure during your extraction procedure (typically slow steady force applied in a controlled and deliberate manner), and possibly even a whole lot of it.
But it’s not valid to assume that if you do feel pressure that that is an indication that you’ll soon feel pain too because the two are separate issues (due to the different effect dental local anesthetics have on the two different types of nerve fibers).
2) You shouldn’t feel any pain.
Pain shouldn’t be a significant factor during your extraction procedure. But if you do feel some discomfort you should let your dentist know immediately (use your prearranged “it hurts” signal) so they can numb you up some more.
(A common issue with ineffective numbing is that additional anesthetic needs to be given in a slightly different location than the first round. One where it will have a more profound effect on the nerve that’s transmitting pain sensations. The good news is that you probably won’t feel much of this second round of injections since your soft tissues in the area are already numb.)
Pain vs. Pressure
Be accurate in what you report to your dentist as a problem. Pain sensations are something that you shouldn’t have to endure and your dentist can do something about it. Feeling pressure is just part of the normal extraction process.
Giving you more anesthetic will do nothing to lessen the sensation of pressure. And in fact, the needless administration of additional quantities of anesthetic may place you at greater risk for medical complications during your procedure.
And don’t fail to do this …
At the beginning of your appointment, you and your dentist need to set up an It-hurts signal to be used as a clear indication from you that something is amiss and needs to be addressed immediately. (Something as simple as just raising your hand.)
If they don’t suggest doing so, you should. This is your method of guaranteeing that you won’t endure a painful experience needlessly.
D) Expect that you might hear some startling noises.
As explained above, pulling teeth is a fairly physical process (there’s a fair amount of pressure involved). And in light of this fact, it should be no surprise to learn that you may hear a minor snap or breaking noise during your procedure. After all, hard tissues (teeth and bone) are involved.
The good news is that most of these events are just routine and nothing to get excited about. The two most common ones are bone fracture and root breakage.
a) Broken tooth roots.
You may hear your tooth’s root break during the extraction process. In fact, this isn’t necessarily an infrequent occurrence.
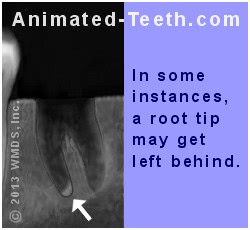
A study by Ahel determined that the level of force that resulted in tooth fracture was sometimes only slightly greater than that required for routine tooth removal.
- Root fracture is the most common intraoperative (during procedure) complication, occurring in 9 to 20% of cases (Ahel).
- A study by Bataineh placed the incidence of crown (the part of a tooth above the gum line) or root fracture at around 12% of cases.
- Generally speaking, if a tooth fractures during its extraction process, it’s most likely due to grasping/applying pressure to it too high up (on its crown as opposed to its root). That’s why forceps are designed with tooth root morphology in mind. (Wray)
▲ Section references – Ahel, Bataineh, Wray
These statistics suggest that if some kind of tooth fracture does occur, your dentist no doubt has had plenty of previous experience in dealing with it.
The consequences of having a root break can vary.
- The piece may prove to be uncooperative and retrieving it may add a fair amount of time to your procedure.
- In other cases, the part that’s left has already loosened up somewhat and can be teased out relatively easily.
b) Bone fracture.
The type of bone tissue found in the center of the jawbone is relatively spongy. In comparison, its outer surface (the cortical plate) is relatively dense.
During an extraction, as pressure is applied to the tooth, the spongy bone that surrounds its root will compress. The denser cortical plate, however, is more brittle and if it receives enough of this pressure it may snap. As you’d expect, this is more likely to happen with larger teeth (molars) or those with longer roots (canines). (Wray)
In the vast majority of cases, this type of breakage is just a minor event (a “hairline” fracture has occurred). After the tooth has been removed, the dentist will simply compress the empty socket so the bone is squished back into place. The fracture can be expected to heal, uneventfully, along with the extraction site as a whole.
▲ Section references – Wray
E) When multiple teeth are extracted.
In cases where more than one tooth will be pulled, the general process described above will simply be repeated for each one.
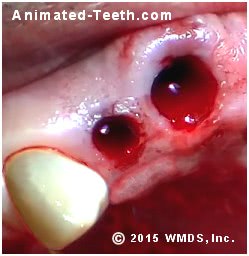
Tooth sockets immediately after the extraction process.
There may be some economies of scale available for some procedures. For example, when removing multiple adjacent teeth, the dentist might detach the gum tissue from them all at the same time. And they might position their elevator so it loosens up the adjacent tooth somewhat at the same time.
Your dentist will choose a specific order.
Beyond the above considerations, each tooth will be taken out in turn. As a general rule, a dentist will typically remove lower teeth before upper ones, and back ones before front ones so to avoid the issue of bleeding obscuring their view.
▲ Section references – Wray
F) “Closing” your extraction site.
Once your tooth has been removed, your dentist will need to perform a few final steps as they close up your surgical site.
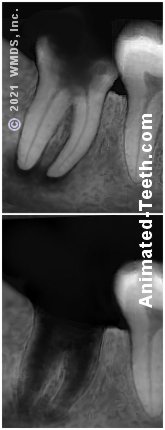
1) Curetting the socket.
Your dentist will gently curette (scrape) the walls of your tooth’s empty socket to remove any remaining pathologic or infected tissues. This process is referred to as curettage and performing this step helps to prevent subsequent cyst formation.
This is a simple process and just takes a few quick moments to complete (maybe a half minute or so). The walls of your tooth’s socket will still be numb from your procedure, so pain won’t be a factor. You will, however, probably notice the slight pressure of the curette (a dental hand instrument that has small spoon-shaped ends) as it’s being used.
2) Checking the site’s bone tissue for sharp edges.
Your dentist will run their fingers over the surface of your extraction site to check for sharp edges. If they find any, they will then either trim them away or round them off.
As for tool selection, a dentist might use their dental drill, bone-cutting (Rongeur) forceps (dental snippers/pliers), or a bone file (a small handheld rasp) to remove the offending edges. Since your bone tissue will still be numb from your procedure, you shouldn’t feel any pain. However, you probably will feel the touch (pressure, vibrations) of the instrument(s) as it’s used.
For single-tooth extractions, checking for sharp edges will just take a second or two, and trimming the offending bone tissue just a minute or two more if it’s even needed (most likely it won’t be). When multiple teeth have been removed the process may be more involved and take longer. (In some cases, this step may be classified as alveoloplasty Procedure details.)
3) Irrigating your extraction site.
Your dentist will irrigate (gently flush with liquid) your extraction site and tooth’s empty socket to float away any loose bone or tooth fragments that have been left behind. When performing this step they may use a syringe filled with saline solution or even just water. Their assistant will suction away all excess fluids.
4) Checking for sinus complications.
If you’ve had any upper back teeth removed (primarily molars) your dentist will need to test for the possibility of sinus cavity involvement (a communication between your sinuses and oral cavity). That’s because the layer of bone that lies between the tip of your extracted tooth’s roots and the floor of your sinuses can be paper thin and may be damaged during the extraction process.
As a test, your dentist will gently pinch your nostrils closed. They’ll then ask you to gently blow air into your nose. If air escapes through the tooth socket (causes bubbles in your tooth’s socket), the dentist knows an oral-antral communication exists and needs to be addressed.
5) Compressing the socket.
When extracting a tooth, a dentist will rock the tooth back and forth so to expand (enlarge) its socket to the point where the tooth is finally free to come out (explained above). Now that your tooth has been removed, your dentist will use firm finger pressure and compress this expanded area of bone back toward its initial conditions. Doing so restores the shape of the jawbone and may help to control postoperative bleeding.
You won’t feel any discomfort during this step (you’ll still be numb from your procedure) but you will feel the finger pressure they apply for just a few moments.
6) Placing blood clotting aids.
If your dentist is concerned about the possibility of prolonged postextraction bleeding, they may place materials in your tooth’s socket that assist with blood clot formation. Clotting aids explained.
7) Suture placement.
Closing some tooth extraction sites will need to include suture placement. For most single-tooth procedures, stitches probably won’t be needed. But they are routinely placed following “surgical” extractions (defined below) or cases where multiple adjacent teeth have been removed. Placing stitches. How it’s done.
8) Placing gauze over your surgical site.
As a last step used to close your wound, your dentist will place folded pieces of gauze (one or several) directly on your extraction site and then ask you to bite down on this mound as a way of placing firm pressure on it.
Placing prolonged direct pressure on a wound is a very effective way to control its bleeding and promote the formation of a blood clot. This is such an important technique and step that we explain its use in detail here: Controlling postextraction bleeding Using gauze.
What happens with your pulled tooth and its dental restoration?
Once your extraction process has been completed, your tooth and its restoration are still yours, just like they were before your tooth was pulled. So, if you want either of them, all you have to do is ask.
The main reason to keep your tooth’s restoration is that it has some value (like a gold crown) and you can sell it. Of course, you may not have any idea about which kinds of dental restorations have scrap value. If not, read this page: What can the value of scrap dental restorations be How much $ ?.
If you don’t ask for your restoration, and your dentist thinks that there’s any likelihood that it has any value at all, you can rest assured that they’ll add it to their assortment of other dental work they’ve “inherited.” Later on, they’ll sell what they’ve collected to a scrap metals refiner and have a “free” dinner on their benevolent patients.
G) Dismissing you at the end of your appointment.
Once your extraction procedure has been completed, there are still a few steps your dentist must take.
1) Controlling bleeding.
As mentioned above, at the end of your procedure your dentist will place one or more pieces of gauze over your wound and then ask you to bite down on it. The steady pressure you apply over the next hour will play an important role in helping to control the bleeding from your extraction site. (Be sure to follow these instructions. Nothing is more important or effective. )
2) Minimizing swelling.
If your dentist expects much post-operative swelling to form, at the end of your appointment they may give you an ice pack (or even just a latex glove filled with ice) to apply to your face. They’ll do this because they know that the sooner cold therapy is begun the more effective it will be. (More details about post-surgical swelling. What to expect. | How to manage it.)
With uneventful single-tooth Simple extractions (defined below), concerns about swelling are typically just minimal, with little to none becoming visible. However, with difficult extractions, Surgical extractions (defined below), or when removing multiple adjacent teeth, substantial swelling may form and therefore preventive steps are usually warranted.
3) Postoperative instructions.
Your dentist will need to both verbally explain and give you a printed copy of postoperative instructions Example List to follow. This list will include details about what you can or should not do both during this day of your procedure (the 1st 24 hours) and the days that follow.
These instructions will include topics such as eating, brushing, rinsing, smoking, physical activities, pain control, stopping bleeding, managing swelling, etc… and are extremely important to follow closely. They will help you avoid complications as your healing process progresses.
Additionally, they’ll also need to advise you about how much postop rest and recuperation time should be allowed. Jump to page.
4) Your trip home following your extraction.
When you first get out of the dental chair after your extraction, you may find that you’re a little unstable. If so, just ask to sit back down for a while until things return to normal.
The same goes for as you prepare to leave your dentist’s office. If you need time to sit and adjust, or even ask for assistance, just do so. They fully expect that some patients will require more attention and aid after their procedure than others.
Can you drive yourself home after a tooth extraction?
Per your dentist’s permission, in the vast majority of cases where just a local anesthetic has been used, you should be able to drive yourself home following your appointment. If some type of sedative has also been administered (especially an oral or IV one), another person’s assistance and monitoring will probably be insisted upon for your trip home and some hours afterward.
For details about what’s usually indicated with different sedation methods, see this page: Conscious sedation techniques. Needed precautions.
How long will your extraction take?
Most “simple” (see definition below) single-tooth extractions will take on the order of 20 to 40 minutes. We give a precise breakdown (type of tooth, procedure time, numbing time, etc…) on this page: How long does an extraction take? What to expect.
Not all extractions are “simple.”
a) Simple extractions.
A vast majority of tooth extractions are completed using the simple mechanics described above. Specifically:
- The minor expansion of the socket and adjacent bone.
- Separation of the ligament that binds the tooth in its socket.
- The uncomplicated removal of the tooth using extraction forceps.
Actually, there’s a name (a classification) for these types of cases. They’re literally termed “simple extractions”.
An example.
Removing tooth #2 in our picture will likely be a “simple” extraction. Although it’s severely decayed, it’s erupted and has a normal positioning. It can probably be teased out just by using the techniques described above.
b) Surgical tooth extractions.
There can be situations where some aspect of a tooth, such as its positioning, shape, brittleness, or deteriorated state complicates its removal. If so, a “surgical” extraction What is this? will be required. (As an example, the impacted tooth (#1) in our picture above will require “surgical” removal.)
Two interesting aspects of this process are:
- The additional steps taken simply set the stage so the tooth can then be removed using the same basic principles explained above.
- Despite the fact that the added steps are surgical in nature, using them may actually serve to decrease the overall level of trauma created by the extraction process.
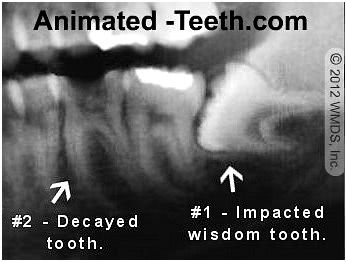
Surgical (#1) vs. Simple (#2) extractions.
Can you pull your own tooth?
Most humans have no doubt extracted at least one, and more likely several, of their own teeth. Of course, we’re talking about (rootless) baby teeth. And that situation is quite a bit different than extracting a “permanent” tooth. ( Here’s why baby teeth come out so easily.)
What about permanent teeth?
Every dentist has encountered some teeth that are so loose in their socket (gum disease is usually involved) that they offer little resistance to the extraction process.
However, even in cases where the physics of the extraction process seem as though they would be possible to accomplish (like with just finger pressure), there are a number of reasons why trying to remove a tooth on your own still doesn’t make a good idea. We discuss the various issues involved in our blog post: Can you pull your own tooth? Should you?
Page references sources:
Ahel V, et al. Forces that fracture teeth during extraction with mandibular premolar and maxillary incisor forceps.
Bataineh AB, et. al. Patient’s pain perception during mandibular molar extraction with articaine: a comparison study between infiltration and inferior alveolar nerve block.
Fragiskos FD. Oral Surgery. (Chapter: Simple Tooth Extraction)
Koerner KR. Manual of Minor Oral Surgery for the General Dentist.
Wray D, et al. Textbook of General and Oral Surgery. (Chapter: Extraction Techniques.)
All reference sources for topic Tooth Extractions.
Comments.
This section contains comments submitted in previous years. Many have been edited so to limit their scope to subjects discussed on this page.
Comment –
Removing premolar teeths.
Hey there.Im going to extract 4 premolar teeths(2 top and 2 bottom)and next week Im going to extract 2 teeths first one top and one bottom and Im nervous.Will it hurt when I extract my premolar teeths?
Tata
Reply –
From your question, it seems you haven’t found our “do tooth extractions hurt?” page.
It’d be our guess that your fears are unwarranted. But as that page describes, it’s your cooperation and communication with your dentist during the extraction process that goes a long way in helping to insure a pleasant experience. You should read it. Best of luck.
Staff Dentist
Comment –
I’m due to have an upper extraction.
I’m having an upper back tooth removed due to abcess.( Luckily I’m in the unique position of have a virgin wisdom tooth in the perfect position to fill the gap).
I have a lot of sinus pain and am just interested how the dentist checks the sinus cavity after extraction. I didn’t realise my sinus pain could be linked to the tooth.
Thanks for all the information. I feel prepared knowing exactly what to expect and how to manage my own aftercare
NG
Reply –
You state: “I didn’t realise my sinus pain could be linked to the tooth.”
It can actually work both ways. The bone that encases a tooth’s roots and also serves as the floor of a sinus can be paper thin. So, if there is an infection in the sinus, it can affect the nerve that runs through this bone and on into a tooth, thus causing tooth pain. Or the reverse, byproducts from an infection emanating from a tooth can spread to the sinus cavity and affect it.
We’re not so sure to what degree your dentist will “check” your sinus after your extraction (in terms of evaluating your original complaint). It seems they have found a clear problem with your tooth (an abcess) and that absolutely needs to be taken care of.
Since this problem lies in the region of your sinuses, it makes a logical assumption that it is also the cause of the problem with them. If it is, getting rid of the tooth (the source of the problem) will allow your body to resolve the sinus issue on its own (clear up the remnants of the infection). Only time will tell. It could be possible that another, purely sinus related, problem exists.
Other than that, there is a specific post-extraction sinus check that is routinely done by dentists after any upper back tooth is removed.
As mentioned before, the bone that encases a tooth’s roots can be paper thin, and therefore when an upper tooth is removed this bone might be damaged. If so, a hole would exist between the patient’s sinuses and their mouth (an oral-antral communication).
Small openings will usually close on their own during healing. With larger ones however, the dentist will want to close up the extraction site snugly so to aid with insuring this.
The way the opening is discovered at the time of the extraction is this: The dentist will hold the patient’s nose close and then ask them to gently blow air into their nose. If air escapes via the tooth socket (creates bubbles), the dentist knows an oral antral communication exists.
Not disrupting this fragile bone (whether or not and outright opening exists) is why as a part of post-op instructions patients are told not to blow their nose, and to sneeze with their mouth open (both as a way of preventing excessive pressure in the sinuses, see link above).
Good luck with your procedure. We hope it resolves both of your problems.
Staff Dentist
Comment –
Braces after extraction.
Hi, my orthodontist told me that my upper jaw was too wide, so I have to take out my upper premolars to make space and then putting braces to tighten it.
Do you know at what point or when after the procedure they’re going to have to place my braces ?
Do the stitches disappear or are they here forever?
Coco
Reply –
Any stitches that are placed will be removed or dissolve away on their own after a week or two. The space itself will be closed in, either fully or substantially, during your orthodontic treatment. Your braces can be placed fairly immediately, just a week or so after your extractions.
Staff Dentist
Comment –
Upcoming tooth extraction.
Tooth #20 has become a problem. It has cracked out the back and has a large filling which is loose. It has also had a root canal done a very long time ago. Many dentists have told me it should come out.
I am frightened out of my wits. I am so worried about the pain, possibility of swelling and bleeding. I truly do not know what to do with myself.
MN
Reply –
We just don’t see anything in your narrative that suggests that the extraction procedure you require will be especially difficult or troublesome.
In regard to the process of having your tooth pulled, tooth #20 is a single rooted (lower left 2nd) premolar. It has a location that provides a dentist with great access and visibility, which should help the procedure to more smoothly and quickly.
In regard to pain and swelling, we would think you have more to be concerned about by leaving the tooth in place rather than having it out.
With the exception that there’s a medical issue involved, we’re unclear why you anticipate problems with controlling bleeding after the extraction.
Something you don’t mention that you might consider is the use of sedation for your procedure. Doing so is frequently benefits both the patient and dentist.
As mentioned above, proceeding with your treatment almost certainly holds more benefits for you than not. Doing so will allow you to make decisions, rather than conditions with your tooth dictating the course of events. Good luck.
Staff Dentist
Comment –
First-time tooth extraction.
I want to know if extracting a tooth that had previous root canal treatment more difficult than extracting a normal tooth?
Tama
Reply –
A tooth that has had root canal treatment is generally considered to be more brittle than a live tooth, and as such more likely to fracture during the extraction procedure. However, if that type of event occurs, it may or may not add to the level of difficulty of removing it. It simply depends on the manner in which it has broken.
Staff Dentist
Comment –
Tooth pulled tomorrow.
I am 13 and I’m getting my very last baby molar tooth pulled out and I am nervous and scared. And it’s weird because that tooth is half out and half still in my gum according to the X Ray I got yesterday. I need advice please.
Sonia R
Reply –
You’re overlooking all of the things your comment states that are favorable for your procedure.
You state you are 13 yr. That is the normal age for this tooth to fall out on its own. Despite the fact that it hasn’t, there certainly is a chance that the root of the tooth has already resorbed significantly, thus making the extraction less difficult than it would have been at any time previously.
What you say about the appearance of the tooth on the x-ray suggests the same thing (the tooth is 1/2 out and 1/2 in).
Just concentrate on being a cooperative patient and no doubt your tooth will be out in a flash.
Staff Dentist
